Test cases using selenium IDE step by step
Step 1: Download the selenium IDE and selenium-server-standalone-2.28.0.jar (31.5MB).

Step 2: Installing selenium IDE,
(you must need mozilla firefox for selenium ide test cases)

Step 3: After the successful installation, You will be able to see the selenium IDE in your mozilla tools option.

Step 4: You will be able to see the play button like below,

Start the play button, and enter some address like (www.google.co.in) in the browser and enter some values in the google search box (www.ngdeveloper.com) and stop the selenium IDE button.
Step 4: Run the downloaded selenium server standalone like below,

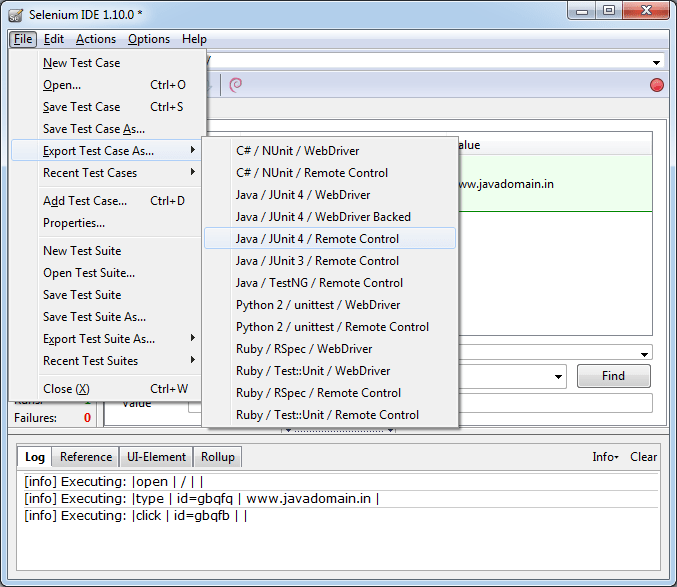
Step 5: Once the record has been stopped, export the program like below to execute in eclipse.
package com.ngdeveloper.com;

import com.thoughtworks.selenium.*;
import org.junit.After;
import org.junit.Before;
import org.junit.Test;
import static org.junit.Assert.*;
import java.util.regex.Pattern;

public class javadomain_selenium {
	private Selenium selenium;

	@Before
	public void setUp() throws Exception {
		selenium = new DefaultSelenium("localhost", 4444, "*chrome", "http://www.google.co.in/");
		selenium.start();
	}

	@Test
	public void testJavadomain_selenium() throws Exception {
		selenium.open("/");
		selenium.type("id=gbqfq", "www.ngdeveloper.com");
		selenium.click("id=gbqfb");

	}

	@After
	public void tearDown() throws Exception {
		selenium.stop();
	}
}
Copy the above program to the eclipse and Run as -> Junit Test.
Note:
You must have the junit-4.3.1 jar and selenium-server-standalone-2.28.0 jar file. Add both files in java build path.
To add java build path,
Right click on the Project -> Build path -> Configure build path and Add external Jars and add the above jars.

After running the above program, Under Junit (In eclipse window -> show view -> junit) able to see the result.
Green color indicates success and red color indicates failure.
Thanks for reading this post……………!!!